Firmware Utility Script
Overview
The ChromeOS Firmware Utility Script simplifies the most common functions most users need when interacting with the firmware on their ChromeOS device.
It can be run from ChromeOS, or any Linux distribution which has a full shell. It cannot be run via WSL or a virtualized environment (i.e., a ChromeOS penguin shell).
Currently, it allows the user to:
- Install/Update the RW_LEGACY firmware (allows dual booting of ChromeOS + Linux)
- Install/Update coreboot/UEFI Full ROM firmware (for running Linux/Windows without ChromeOS)
- Backup Current Firmware (to local filesystem or USB device)
- Flash Custom Firmware (from local filesystem or USB device)
- Set the Boot Options (GBB Flags) (only for stock ChromeOS firmware)
- Set the device's Hardware ID (for both stock and UEFI firmware)
- Restore the Stock Firmware (only for devices which have not reached EOL)
- Clear UEFI NVRAM (only for UEFI Full ROM firmware)
At startup, the Firmware Utility Script will automatically detect the device, OS, and current firmware details, and show a customized menu options based on this information. Some options may be greyed-out/disabled for some devices. Because most of these operations are being done to normally read-only parts of the firmware, the firmware write protect will need to be removed for most of the script's functions. This is documented for each function below, and the script will likewise check and display the write-protect state for each function that requires it to be disabled.
NOTE
Starting with ChromeOS R117, this script must be run from a VT2 terminal (from login screen: [CTRL+ALT+F2], login chronos); it cannot be run from a crosh shell ([CTRL+ALT+T] when logged in) due to the removal of sudo, or from a crostini (penguin) terminal; crostini is a virtualized container and lacks the necessary access to read or modify the firmware.
If running the script from Linux (vs ChromeOS), any terminal app will do. On most distros CTRL+ALT+T or Super/Search+T will open the default terminal.
IMPORTANT
This script must be run as a normal/non-root user. Running it as root will break things. DO NOT RUN 'SUDO SU' BEFORE RUNNING THE SCRIPT CMD BELOW.
And do note that in the script command below, it's -LOf (L capital O f), not L zero f.
To download and run this script under ChromeOS or Linux, from a terminal/shell type: cd; curl -LOf https://mrchromebox.tech/firmware-util.sh && sudo bash firmware-util.sh and press [ENTER].
If you encounter certificate related errors when downloading the script from ChromeOS, then add -k to the curl command to bypass SSL certificate checking as so: cd; curl -LOfk https://mrchromebox.tech/firmware-util.sh && sudo bash firmware-util.sh and press [ENTER].
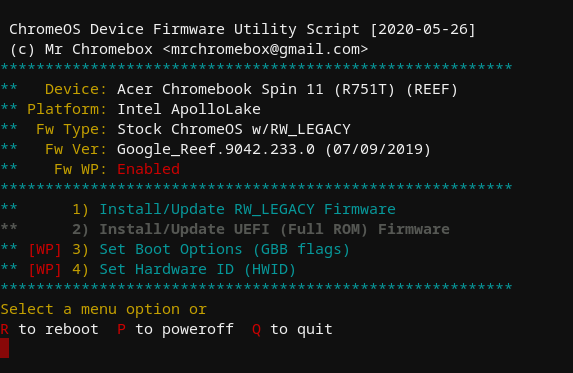
Firmware Utility Script, on device with stock firmware and WP enabled
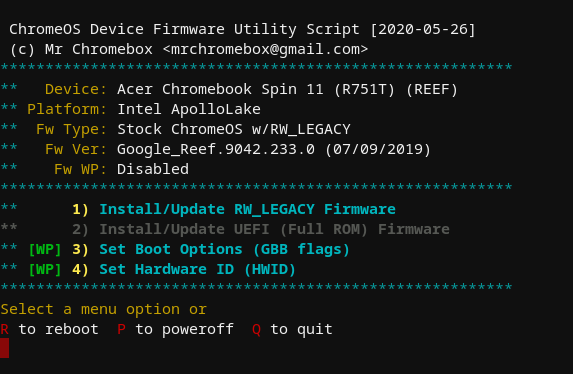
Firmware Utility Script, on device with stock firmware and WP disabled
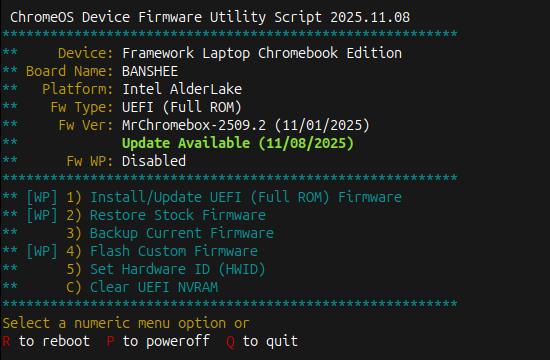
Firmware Utility Script, on device with Full ROM firmware and WP disabled
In the screenshots above, only the script functions available for the device and current firmware are enabled (cyan text); unavailable functions are in grey. Features which require the firmware WP to be disabled are clearly labeled as such, along with the ability of that function to be used based on the current WP state.
Understanding the Menu System
The Firmware Utility Script displays a dynamic menu that adapts based on your device's current state. Understanding how the menu works will help you know which options are available and why.
Menu Detection and Display
When the script starts, it automatically detects:
- Device Information: Board name, hardware platform, device description
- Current Firmware Type: Stock ChromeOS, Stock + RW_LEGACY, or UEFI Full ROM
- Firmware Version and Date: Currently installed firmware version
- Write-Protection Status: Whether hardware/software write-protect is enabled or disabled
- Device Support: Which firmware types are available for your specific device
Based on this information, the script shows one of two main menus:
- Stock Firmware Menu: Shown when running stock ChromeOS firmware (with or without RW_LEGACY)
- UEFI Firmware Menu: Shown when running UEFI Full ROM firmware
Menu Options: Enabled vs Disabled
Menu options are displayed in different colors to indicate availability:
- Cyan/Blue text: Function is available and can be used
- Grey text: Function is not available for your current configuration
Options may be disabled (greyed out) for several reasons:
- Firmware type incompatibility (e.g., RW_LEGACY not available on UEFI firmware)
- Device has reached End of Life (EOL) - see restrictions below
- Feature not supported on your specific device model
- Device capability limitations
End of Life (EOL) Device Restrictions
Devices that have reached Google's Automatic Update Expiration (AUE) date are considered End of Life (EOL). For EOL devices, certain script functions are intentionally restricted:
- RW_LEGACY firmware updates: Not available - use UEFI Full ROM firmware instead
- Stock firmware restoration: Blocked to prevent restoring outdated, insecure ChromeOS versions
Why these restrictions? EOL devices no longer receive ChromeOS updates from Google, making the stock firmware insecure and unsupported. The script enforces these restrictions to guide users toward better alternatives (UEFI firmware + Linux/Windows/ChromeOS Flex) that continue to receive security updates.
UEFI Full ROM firmware installation remains fully supported on EOL devices, providing a path forward for continued device use.
Write-Protection Indicators
Options that require firmware write-protection to be disabled are clearly marked with [WP] in the menu. The script also displays your current write-protect status in the header:
- Red "Enabled": Write-protect is enabled - options marked [WP] cannot be used
- Green "Disabled": Write-protect is disabled - all compatible options are available
Note that not all functions require WP to be disabled. For example, installing RW_LEGACY firmware and backing up firmware work with WP enabled.
Firmware Update Notifications
If you're running UEFI Full ROM firmware and an update is available, the script will display a green notification message showing the available update date. This allows you to easily see when newer firmware is available without manually checking.
The update check compares your current firmware date against the latest available firmware file for your device.
Automatic Data Preservation
When flashing firmware (UEFI Full ROM or Custom Firmware), the script automatically preserves critical device-specific data to ensure your device maintains its unique identifiers and optimal performance. This happens transparently - you don't need to do anything.
What data is preserved:
Serial Number: Your device's unique serial number (if present in the current firmware). This maintains device traceability and identification.
Hardware ID (HWID): The board-specific hardware identifier that identifies your device model. This is essential for proper firmware identification and updates. For stock firmware, this is extracted from the GBB region; for UEFI firmware, it's extracted from CBFS.
Vital Product Data (VPD): Contains manufacturing and device-specific information including:
- MAC Address: The unique Ethernet MAC address (critical for Chromeboxes)
- Region/localization data
- Manufacturing date and other product identifiers
- Calibration data for certain hardware components
RW_MRC_CACHE: Memory Reference Code cache containing memory training data. Preserving this significantly speeds up the first boot after flashing (by up to 60 seconds), as the system doesn't need to retrain memory timings.
SMMSTORE: Firmware region containing UEFI NVRAM variables (on UEFI firmware). This preserves your boot order, boot entries, and other UEFI settings when updating UEFI firmware.
When preservation occurs:
- Installing/updating UEFI Full ROM firmware
- Flashing custom firmware
- Restoring stock firmware (VPD and HWID are merged when available)
Why this matters:
- Chromeboxes: Without VPD preservation, the Ethernet MAC address would be lost, requiring manual configuration or resulting in a duplicate/invalid MAC address on the network.
- All devices: Preserving the HWID ensures the correct firmware can be identified for future updates.
- Performance: MRC cache preservation means you don't experience slow first boots after firmware updates.
- Convenience: SMMSTORE preservation means your boot order and UEFI settings persist across firmware updates.
The script handles all data extraction, validation, and injection automatically. If any component cannot be extracted from the current firmware, the script will continue safely - the only impact is that specific data won't be available in the new firmware (e.g., you may need to set a new HWID or MAC address manually).
Script Functions Explained
Install/Update the RW_LEGACY Firmware
This option performs two simple tasks: it sets the crossystem boot flag necessary to enable Legacy Boot mode, and it installs an RW_LEGACY firmware update appropriate for the device. Users will have the option to set the default boot device (internal storage [default] or USB/SD); Haswell/Broadwell Chromebox users will also have the option to enable "headless" (no display attached) booting, which is really only useful if you're going to run the box without a display and connect remotely (e.g., via ssh). Changing either of these options requires re-running this script function.
After updating the RW_LEGACY firmware, Legacy Boot Mode can be accessed via
[CTRL+L]on the Developer Mode boot screen. It can also be set as the default by changing the GBB Flags via 'Set Boot Options' feature below.EOL DEVICES
RW_LEGACY firmware updates are not available for devices which have reached End of Life (EOL/AUE). For EOL devices, use the UEFI Full ROM firmware instead to continue using your device with an alternate OS.
Requires firmware write-protect disabled:
NOInstall/Update UEFI (Full ROM) Firmware
As this is a full replacement firmware, the script will offer users the option to back up their stock firmware to USB (required if the script is not capable of providing a stock firmware image).
As Chromeboxes store their Ethernet MAC address in the RO_VPD (read-only vital product data) region of the stock firmware, the script will extract that region from the stock firmware and inject it into the new firmware ensuring the unique MAC address isn't lost. It will also persist the VPD region across firmware updates, so this is all transparent to the user.
After installing the UEFI (Full ROM) Firmware, your device will boot directly in UEFI Mode; ChromeOS will not be able to boot. Your ChromeOS device is now a "regular PC," and you can install the OS of your choice without any special instructions.
Requires firmware write-protect disabled:
YESSet Boot Options (GBB Flags)
This script function allows you to customize the Developer Mode boot screen behavior, including the timeout and default boot target. This is a wrapper around the
gbb_utilityapplication that reads the GBB (Google Binary Block) region from the stock firmware, sets the flags based on your selection, and writes it back to flash.Available Options:
The script presents six boot option configurations:
Short boot delay (1s) + Legacy Boot/AltFw default
- Developer Mode screen shows for only 1 second
- Automatically boots to Legacy Boot Mode (RW_LEGACY firmware)
- Press
[CTRL+D]to override and boot ChromeOS - Ideal for users who primarily use Legacy Boot Mode
Long boot delay (30s) + Legacy Boot/AltFw default
- Developer Mode screen shows for 30 seconds
- Automatically boots to Legacy Boot Mode (RW_LEGACY firmware)
- Press
[CTRL+D]to override and boot ChromeOS - Useful if you need time to interrupt the boot process
Short boot delay (1s) + ChromeOS default
- Developer Mode screen shows for only 1 second
- Automatically boots to ChromeOS (standard behavior, but faster)
- Press
[CTRL+L]to override and boot Legacy Boot Mode - Good for ChromeOS users who want a quick boot
Long boot delay (30s) + ChromeOS default
- Developer Mode screen shows for 30 seconds (factory default timing)
- Automatically boots to ChromeOS
- Press
[CTRL+L]to override and boot Legacy Boot Mode - Standard configuration with more time to select boot mode
Reset to factory default
- Restores all GBB flags to factory defaults (0x0)
- 30-second timeout, ChromeOS default boot
- Required before exiting Developer Mode
- Removes all custom boot options
Cancel/exit
- Returns to main menu without making changes
Automatic Flag Settings:
For all options except "Factory Default," the script automatically sets additional flags:
GBB_FLAG_FORCE_DEV_BOOT_LEGACY(0x400): Forces Legacy Boot Mode to be available, overriding the crossystemdev_boot_legacyflagGBB_FLAG_FORCE_DEV_SWITCH_ON(0x8): Prevents accidentally exiting Developer Mode via spacebar, protecting your configuration and data
Visual Indicator:
When GBB Flags are set to anything besides Factory Default, a small black box appears in the upper-left corner of the Developer Mode boot screen showing the current flag value and other firmware/OS info. This is normal and expected behavior.
Important Notes:
- You can always override the default boot target with keystrokes:
[CTRL+D]for ChromeOS,[CTRL+L]for Legacy Boot Mode - Boot options can be changed at any time by re-running this function
- You must reset flags to Factory Default (option 5) before you can exit Developer Mode
- This function only works with stock ChromeOS firmware or stock + RW_LEGACY firmware
Supported Devices:
All ChromeOS devices running stock (or stock + RW_LEGACY) firmwareRequires firmware write-protect disabled:
YESSet Hardware ID (HWID) - Stock Firmware
This script function is a wrapper around the
gbb_utilityapplication built into ChromeOS. It will read the GBB region from the stock firmware, set the HWID based on user input, and write it back to flash. The only time this function is needed is if one flashed a generic recovery image firmware (aka a shellball ROM) instead of restoring a backup of their own device firmware. Shellball ROMs extracted from a recovery image have a generic HWID embedded which ChromeOS does not recognize as valid for purposes of OS and firmware updates (among other things), so it's necessary to set a valid one. HWIDs aren't unique, so any valid one for a given device with the same board name will work.Note: If you restored your stock firmware using the option from this script, it is not necessary to (nor should you) set the HWID afterward.
After setting a valid HWID, simply reboot and ChromeOS updates should work normally.
Supported Devices:
All ChromeOS devices running stock (or stock + RW_LEGACY) firmwareRequires firmware write-protect disabled:
YESSet Hardware ID (HWID) - UEFI Firmware
For devices running UEFI Full ROM firmware, the HWID is stored differently than on stock firmware - it's stored in the CBFS (coreboot File System) rather than the GBB region. This function uses
cbfstoolto modify the HWID.IMPORTANT
Changing the HWID on UEFI firmware is rarely needed and can be dangerous. An incorrect HWID could result in the wrong firmware being flashed during an update, which could brick your device. Only change the HWID if you fully understand the implications.
The script will:
- Display your current HWID (if present)
- Ask for confirmation multiple times (this is serious!)
- Read the current firmware from the flash chip
- Remove the old HWID entry (if present)
- Add the new HWID to the firmware
- Disable software write-protect
- Write the modified firmware back to the flash chip
When would you need this?
- If you flashed a generic/wrong firmware build for your device
- If your HWID was lost or corrupted during a custom firmware flash
- If you're building custom firmware and need to set a proper HWID
Note: The script automatically preserves the HWID when flashing official MrChromebox firmware or using the custom firmware flash function, so manually setting it should rarely be necessary.
After setting the HWID, reboot for the change to take effect. You can verify the HWID was set correctly by re-running the script and checking the value displayed.
Supported Devices:
All ChromeOS devices running UEFI Full ROM firmwareRequires firmware write-protect disabled:
YESBackup Current Firmware
This function allows you to create a backup of the current firmware before making any changes. This is highly recommended before flashing Full ROM firmware or making other significant changes.
The script offers two backup destinations:
Backup to local filesystem: Save the firmware backup to a directory on the system (you can specify a custom path or use the current directory). The backup will be named
BACKUP-[boardname]-[version]-[date].romBackup to USB device: Save the firmware backup directly to a USB drive or SD card. The script will list available USB devices and you can select which one to use.
After creating a backup, store it in a safe place (Google Drive, another PC, etc) as you may need it to recover from a bad flash or to restore your device later.
Supported Devices:
All ChromeOS devicesRequires firmware write-protect disabled:
NOFlash Custom Firmware
This is an advanced function that allows you to flash a custom firmware image from a file. This is useful for testing custom builds, flashing firmware from other sources, or restoring from a non-standard backup.
ADVANCED USERS ONLY
This function is for advanced users who understand firmware internals. Flashing incompatible or corrupted firmware will brick your device. Only use this if you know what you're doing and have the ability to recover from a bad flash.
The script offers two source options:
Flash from local filesystem: Provide the full path to a firmware file (.rom or .bin) stored on the system
Flash from USB device: Select a firmware file from a USB drive or SD card. The script will list available firmware files (.rom, .ROM, .bin, .BIN) and you can choose which one to flash.
Automatic Data Preservation:
When flashing custom firmware, the script will automatically attempt to extract and preserve device-specific data from your current firmware:
- Serial number (if present)
- Hardware ID (HWID)
- Vital Product Data (VPD) - includes MAC address and other device info
- RW_MRC_CACHE - memory training data for faster boot times
- SMMSTORE - UEFI NVRAM variables
This data will be injected into the custom firmware before flashing, ensuring your device retains its unique identifiers and settings.
Important Notes:
- Always create a backup of your current firmware before flashing custom firmware
- Ensure the custom firmware is compatible with your specific device
- The firmware write-protect must be disabled before using this function
- If the flash fails, DO NOT REBOOT - use the restore option to flash your backup
Supported Devices:
All ChromeOS devices running UEFI Full ROM firmwareRequires firmware write-protect disabled:
YESRestore Stock Firmware
This script function restores the stock ChromeOS firmware to your device, allowing you to return to the original factory configuration. The script provides two methods for restoration, and will guide you through the process based on what's available.
Restoration Methods:
The script offers two options for restoring stock firmware:
Restore from USB Backup
- Use a firmware backup file you previously created
- Most reliable method as it restores your exact original firmware
- Preserves your device's original serial number and other unique identifiers
- The script will prompt you to insert the USB drive containing your backup
- You'll select the backup file from the list of firmware files on the USB
Restore from ChromeOS Recovery USB
- Extract the stock firmware directly from a ChromeOS recovery image
- Useful if you don't have a backup of your original firmware
- Requires a ChromeOS recovery USB created for your specific device model
- The script will automatically extract and prepare the firmware from the recovery image
Recovery USB Firmware Extraction Process:
When restoring from a recovery USB, the script performs several sophisticated steps:
- Prompts you to insert a ChromeOS recovery USB for your device
- Uses
debugfsto extract thechromeos-firmwareupdateshellball from the recovery image - Unpacks the shellball to access the firmware components
- Locates the correct BIOS image for your specific board
- Extracts the firmware version information
- Creates a properly-named firmware file
Automatic Data Merging:
During restoration, the script automatically preserves and merges critical data:
VPD (Vital Product Data): Extracted from your current firmware if present, then merged into the stock firmware. This is essential for Chromeboxes to preserve the Ethernet MAC address.
HWID (Hardware ID): If extracted from your current firmware, it's injected into the restored firmware using
gbb_utility. If extraction fails, a valid generic HWID for your board is set.GBB Flags: Automatically reset to factory default (0x0) before flashing
Modified Shellball ROMs:
For most devices, if a backup isn't available, the script can download a pre-extracted shellball ROM from a recovery image. These device-specific shellball ROMs have been:
- Modified to include a valid hardware ID (HWID) for the device model
- Pre-configured to ensure ChromeOS updates work normally after restoration
- Tested to verify proper functionality
CR50 TPM NVRAM Reset (Automatic):
For devices with CR50 security chips (Apollo Lake and newer), the script automatically resets the TPM and kernel version data stored in the CR50 NVRAM to the factory defaults after successfully restoring stock firmware. This helps prevent "Secure NVRAM (TPM) Initialization" errors that can occur when booting ChromeOS after restoration.
The script automatically:
- Detects if your device uses a CR50 security chip
- Downloads the
tpmcutility if needed - Resets the TPM data at NVRAM index 0x1007
- Determines the appropriate kernel version reset command based on the firmware version (FWID)
- Resets the kernel version data at NVRAM index 0x1008
This automatic reset eliminates the need for manual TPM reset procedures and should resolve common initialization issues when restoring stock firmware.
After Restoration:
Once stock firmware is restored:
- The script re-enables software write-protect to prevent recovery issues
- For CR50 devices, the script automatically resets TPM and kernel version data in CR50 NVRAM
- Reboot your device
- Create and boot from ChromeOS recovery media to reinstall ChromeOS
- After ChromeOS is installed and booted, re-run the Firmware Utility Script
- Reset the Boot Options/GBB Flags to factory default (if needed)
- (Optional) Exit Developer Mode to fully return to stock configuration
EOL DEVICES - DO NOT RESTORE STOCK FIRMWARE
The Firmware Utility Script will NOT allow you to restore stock firmware on devices that have reached End of Life (EOL/AUE). This restriction exists because:
- Restoring an old, insecure, unsupported version of ChromeOS serves no useful purpose
- The device will not receive OS, browser, or security updates
- Better alternatives exist (Linux, ChromeOS Flex) that provide ongoing updates
- If selling the device, shipping it with an outdated OS that can't be updated is irresponsible
For EOL devices: Continue using UEFI firmware with Linux, Windows, or ChromeOS Flex. See the FAQ for more information about EOL devices and alternatives.
Supported Devices:
All non-EOL ChromeOS devices running non-stock firmwareRequires firmware write-protect disabled:
YES
Device-Specific Functions
Downgrade Touchpad Firmware (Pixelbook/EVE only)
This function is specific to the Google Pixelbook (device codename: EVE) and downgrades the touchpad firmware to an older version that is compatible with Windows.
IMPORTANT
If you plan to run Windows on your Pixelbook, you must downgrade the touchpad firmware, otherwise the touchpad will not work under Windows. The stock touchpad firmware only works with ChromeOS/Linux.
When to use this:
- After flashing UEFI Full ROM firmware on a Pixelbook
- Before installing Windows on a Pixelbook
- Ideally performed before the first reboot after flashing UEFI firmware
The script will download the downgrade firmware file, verify its checksum, and flash it to the touchpad's EC (Embedded Controller). Do not touch the touchpad during the flashing process.
Note: This function may not work reliably under all Linux distributions. If it fails under Linux, try running it from ChromeOS (before flashing UEFI firmware) or from the ChromiumOS environment.
Supported Devices:
Google Pixelbook (EVE) onlyRequires firmware write-protect disabled:
YESUpgrade Touchpad Firmware (Pixelbook/EVE only)
This function is specific to the Google Pixelbook (device codename: EVE) and upgrades the touchpad firmware back to the stock version that is compatible with ChromeOS.
IMPORTANT
If you plan to restore ChromeOS on your Pixelbook, you must upgrade the touchpad firmware back to stock, otherwise the touchpad will not work under ChromeOS.
When to use this:
- After restoring stock firmware on a Pixelbook
- Before reinstalling ChromeOS on a Pixelbook
- After you previously downgraded the touchpad firmware for Windows
- Ideally performed before rebooting after restoring stock firmware
The script will download the stock touchpad firmware file, verify its checksum, and flash it to the touchpad's EC (Embedded Controller). Do not touch the touchpad during the flashing process.
Note: This function may not work reliably under all Linux distributions. If it fails under Linux, try running it from ChromeOS after restoring stock firmware.
Supported Devices:
Google Pixelbook (EVE) onlyRequires firmware write-protect disabled:
YESClear UEFI NVRAM
This function erases the SMMSTORE firmware region, which contains the UEFI NVRAM (Non-Volatile RAM) variables. This is only available when running UEFI Full ROM firmware.
What is NVRAM?
NVRAM stores UEFI firmware settings and variables that persist across reboots, including:
- Boot order entries (which devices/OSes to boot and in what order)
- Boot loader paths for installed operating systems
- UEFI firmware configuration settings
- Secure Boot variables (if applicable)
- Other OS-specific UEFI variables
When would you need to clear NVRAM?
- Boot order is corrupted or contains invalid entries
- System fails to boot and you suspect NVRAM corruption
- After major OS changes or reinstallation
- To reset all UEFI settings to defaults
- Troubleshooting boot-related issues
- After failed OS installations that left broken boot entries
What happens after clearing NVRAM?
After clearing NVRAM and rebooting:
- The firmware will boot to the EFI shell or boot menu (no default boot entry exists)
- Boot entries will be automatically recreated when you boot an OS or update a bootloader
- You may need to manually boot your OS using "Boot From File" in the boot menu the first time
- The default boot order will need to be re-established
Note: Clearing NVRAM is a safe operation and will not affect your installed operating systems or their data - it only removes the firmware's knowledge of how to boot them. Your OS files remain intact on disk.
Supported Devices:
All ChromeOS devices running UEFI Full ROM firmwareRequires firmware write-protect disabled:
YES
The Reboot and Power Off options are (hopefully) sufficiently self-explanatory 😃.
Related Documentation
Before Using the Script
- Getting Started - Prerequisites and decision guide
- Supported Devices - Check device compatibility
- Write Protection - Disabling hardware WP (required for some functions)
- Boot Modes - Understanding Developer Mode
Understanding Firmware
- Firmware Overview - ChromeOS firmware architecture
- Firmware Types - RW_LEGACY vs UEFI Full ROM comparison
- Booting - Boot process and boot order
Reverting & Recovery
- Reverting to Stock - Restoring ChromeOS firmware
- Unbricking - Recovery from failed flash
Troubleshooting
- FAQ - Common questions and answers
- Known Issues - Platform-specific problems
- Debugging - Collecting diagnostic logs
The source for the Firmware Utility Script (as well as all helper/accessory scripts) can be found on my 'scripts' GitHub repository. Any issues, feature requests, and/or improvements can be reported via the issue tracker or a pull request.