Developer Mode
Overview
Putting your ChromeOS device into Developer Mode relaxes some of the restrictions in Verified Boot Mode, and gives the user a bit more control over the system:
- Provides full root access to the system via a VT2 (virtual terminal) shell
- Allows modification of the ChromeOS kernel and root filesystems
- Allows for booting alternate OSes via Legacy Boot Mode/Alternative Bootloader Menu on supported systems
- Allows for several types of firmware updates/upgrades (some of which require disabling the firmware write-protect first)
Because Developer Mode is inherently less secure than Verified Boot Mode, as a warning when booting you will be greeted by the developer mode boot screen:
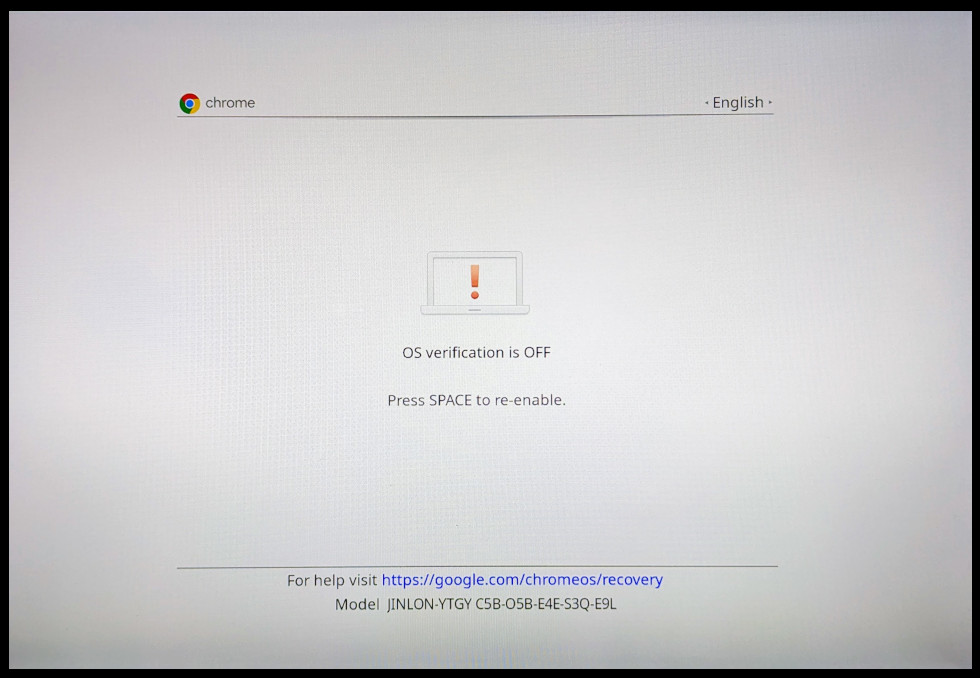
Devices in ChromeOS Developer Mode will show a warning screen on every boot. The screen will time out after 30 seconds, playing a warning beep.
From the Developer Mode boot screen, the following keyboard shortcuts are available:
[CTRL+D]: Boot ChromeOS from the internal disk[CTRL+U]: Boot ChromeOS from an external USB stick or SD card (for ChromeOS developers only)[CTRL+L]: Boot the Legacy Boot payload (SeaBIOS) or show the Alternative Bootloader Menu
By default, after the timeout ChromeOS will boot from internal storage if no option is selected. The length of the timeout (2s or 30s) and the default boot target (ChromeOS or Legacy Boot Mode) can be changed by setting the firmware boot flags (aka GBB flags).
Note: the easiest way to set the firmware boot flags is via the ChromeOS Firmware Utility Script; it presents users with the option to set the boot timeout and boot target without having to know which flags to set / what values to use.
This script function also sets the flags to force-enable Developer Mode (so you don't accidentally exit it) and force enable Legacy Boot Mode (so your battery dying doesn't reset the crossystem legacy boot flag). Setting the firmware boot flags / GBB flags requires the firmware write-protect to be disabled, since it's modifying a normally-read-only section of the firmware (the GBB region).
WARNING
Switching a ChromeOS device between Normal and Developer Modes will wipe all user data! Back up anything important before proceeding.
NOTE
On Chromebooks/tablets, the battery must be plugged in while enabling Developer Mode.
Enabling Developer Mode
Enabling Developer Mode is the first step to running an alternate OS on your ChromeOS device.
First, boot to Recovery Mode. Then proceed below with the applicable instructions for your device.
NOTE
If you're unable to enable Developer Mode and the device keeps returning to Verified Boot (Normal) Mode, it may be due to an MDM (Mobile Device Management) restriction. This can occur on previously managed devices which have not been fully reset. To resolve this:
- Boot normally and complete the OOBE (Out-of-Box Experience) setup with a Google account (non-guest)
- Perform a Powerwash (Settings → Advanced → Reset settings → Powerwash)
- After the Powerwash completes, boot to Recovery Mode and try enabling Developer Mode again
Logging in as a non-guest user takes ownership of the device, removing any previous MDM restrictions. Once this is done, Developer Mode should enable successfully.
Chromebooks/Chromeboxes
Press
[CTRL+D]. This should bring up a warning asking for confirmation for either "Turn OS Verification OFF" or "Enable Developer Mode".Press
[ENTER]. The system should reboot and bring you to the "You are in Developer Mode" or "OS Verification is OFF" screen.Press
[CTRL+D]to boot from internal disk.
Tablets
Press
Volume Up+Volume Downto bring up the menu selection screen.Use the
Volume UpandVolume Downto navigate to "Confirm Enabling Developer Mode", then pressPowerto select it. The system should reboot and bring you to the "OS Verification is OFF" screen.Select "Developer Options", then select "Boot from Internal Disk".
IMPORTANT
Do not enable additional ChromeOS debugging features. While the welcome screen might give you such an option, those will interfere with what you are doing here. This guide is not designed with them in mind.
Getting a (Root-capable) Shell
Once in Developer Mode, there are two ways to get a root-capable shell, which is required for doing anything useful:
On the login screen, press
[CTRL+ALT+F2](F2 is right-arrow on most ChromeOS keyboards), then login with userchronos(no password is required, nor should one be set). This gives you a VT2 shell.When logged in (as a guest is ok) and with a browser window open, press
[CTRL+ALT+T], then typeshelland press[ENTER]. This gives you a crosh shell.
NOTE
ChromeOS R117 removed the ability to use the sudo command in a crosh shell, making it significantly less useful. For anything requiring sudo (like the Firmware Utility Script), you'll need to use a VT2 shell instead.